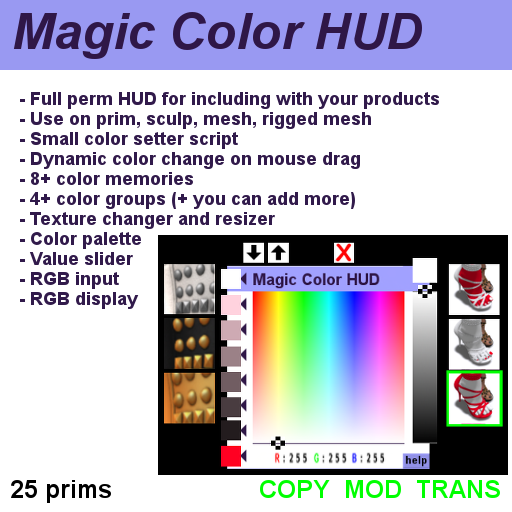
Magic Color HUD System for Builders
Kayaker Magic, September 2014
New in Version 1.3:
- The color changer is now also a re-sizer. You can have several buttons for different rates of change.
- It also includes a texture changer.
- There are new options for changing only one face of a prim at a time. (For mesh).
- There is a button for deleting the color setter scripts (after changing color for the last time)
|
This is a HUD that you can add to your products to enable color/texture/size change options in objects that you can then sell. It can change colors in objects set up to listen with a supplied color setter script. It can also change the texture on any face of the object and change the objects size. It is full perm on the outside (the scripts inside are NOMOD). Instead of a note-card to set up this HUD, you will put information in the names of all the prims in the HUD to customize it for your product.
The color palette is a large colorful area that selects colors by hue and saturation. A separate slider sets the value (brightness) of the color. The color picking areas are “click and drag” so your customers will see the colors on your product changing dynamically as they drag the mouse around. The HUD comes with 8 color memory tabs where colors can be stored for future use. It comes with 4 “color group panels”. Two size change buttons and 3 texture change buttons. Most things in this HUD are modifiable and you can add or subtract color memories, color group panels, texture buttons and resize buttons. Even the background texture is full perm so you can put your company logo on it. The HUD does most of the work and only a single small low lag “color setter” script must be put in the root prim of your product to communicate with the HUD. But to reduce the lag to zero, your customers can remove that color setter script with the click of a button.
Available for sale on the Kitely Marketplace for export.
|  |
The latest additions to the documentation will always be appear here first. Tutorials to help you learn how to use this HUD system can be found below. You can also see the posing system live in-world at several locations. Check out my homepage for a list of links to all my locations in-world. If you like the Magic Color HUD, you might also like my Magic Pose System.
Normal use of the Magic Color HUD
|
Setting up the Magic Color HUD
|
Mesh Shoes with the Magic Color Hud
|
Modifying and Customizing the Magic Color HUD
How the Magic Color HUD is used in your final product:
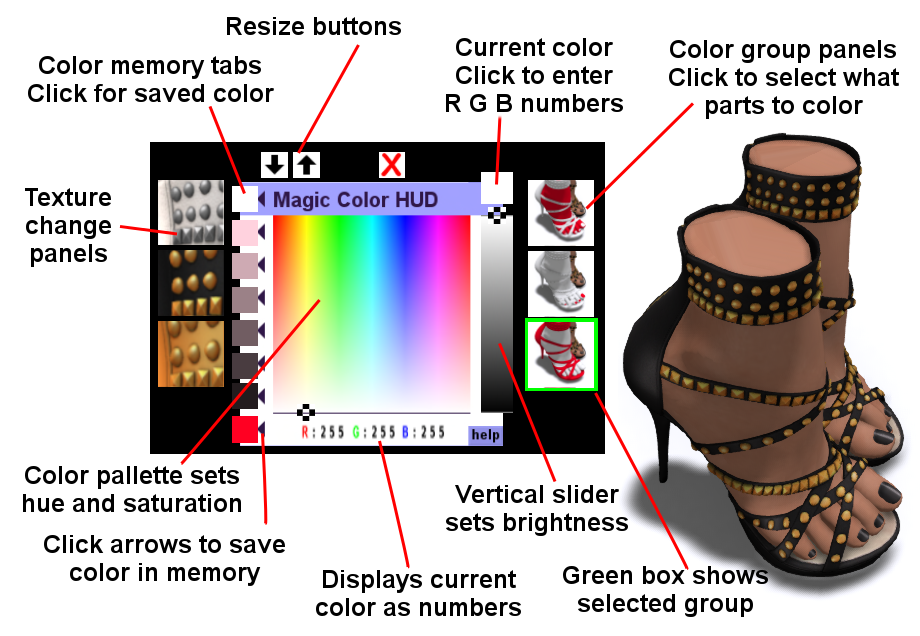
The Magic Color HUD has several different areas you use to choose colors, textures, size and efficiency:
| PALETTE | In the center of the HUD is a colorful patch that sets the hue and saturation of a color. You can left-click and release to select a color. Or you can left-click and drag the mouse, the color will change as you drag the cursor around. The color on the product will dynamically change as well.
|
| VALUE BAR: | A vertical bar to the right of the palette, left-clicking or left-clicking and dragging the mouse on this area changes the value (brightness) of the color.
|
| CURRENT COLOR | Above the value bar is a square that shows a sample of the color you have selected. This will change dynamically as you drag the cursor over the palette and value bar. If you click on the current color square, you will be prompted to type in a color as a triplet of values between 0 and 255. This will become the current color, the cursors on the palette and value bar will change, and the currently selected color group on the product will change color to match.
|
| COLOR MEMORIES | These are a column of tabs on the left side of the palette. First select a color using the palette and value bar, then click the arrow next to one of the memory tabs to store your color there. Later, you can click on the color memory tab to change the current color to the saved color.
|
| COLOR GROUP PANELS | These are a column of squares on the right side of the value bar. Each panel has a picture of the product with different areas highlighted. Click on one of the color group panels to edit the colors in the highlighted areas. (A green outline surrounds the selected panel to indicate this). Then those areas of the product will change colors in step with the current color as you click and drag the mouse on the color areas of the HUD.
|
| TEXTURE CHANGE BUTTONS | These are a column of squares left of the color memories. Clicking on one of these buttons changes the texture map of the currently selected color group.
|
| DELETE SCRIPTS BUTTON | Click on this button to delete the color change script in the product. This will freeze it with the current size, colors and textures, so make sure you are done making changes before you do this.
|
| RESIZE BUTTONS | Click on the up or down buttons to change the size of the product.
|
| RGB READOUT | Below the palette the R G and B values are displayed as numbers between 0 and 255.
|
| HELP | Clicking on this button brings up a note card with this text in it.
|
Getting Started with the Magic Color HUD:
When you buy the Magic Color HUD from my vending machine, it arrives in a folder named "Magic Color" in your inventory. In that folder you will find the "Magic Color HUD" object, an object containing the "Magic Color setter" script. (You must rez this and drag the script out. Scripts are shipped inside prims for safety). There will also be a full perm copy of the palette texture map and copy of this document for reference.
Setting up the Magic Color HUD for your product:
- Wear the HUD. It goes to the "center" slot on your screen by default.
- Rez a copy of your product. It must be within 10 meters of your avatar to work.
- Put a copy of the "Magic Color Setter" script in the root prim of your product. If your product is made of several separate objects, like a pair of shoes, you must put a separate copy of this script in the root prim of each object.
Color Group Pannels:
- Name all the prims in your object so that all the prims that change color together have the same name. The name can just be a number, or it could be any string that does not have a vertical bar (|) character in it. Short declarative names are best, like “straps”. The root prims, of course, can have a long descriptive name.
- Put texture maps on the color group panels in the HUD (largish white squares on the right of the value bar). These texture maps should have a picture of your product with each color group highlighted in some way. (For example, The straps colored red on a white shoe).
- There are two kinds of group panels: The “group” type will change the color on sculpts or change the color on every side of legacy prims. The “face” type will change the color on a single face of a mesh prims.
- If each group refers to a separate prim, rename each of the color group panels to start with “group “ and end in one of the color group prim names chosen above. For example, if your product has prims named “straps” you should name one of the color group panels “group straps”, and that panel should have a picture of your product with the straps highlighted. You cannot have two color group panels with the same name. You can have several prims with the same group name, and they will all change together. If you need fewer or more than the default 4 group panels, this is easy to do. See the “Changing the Look” discussion below.
- If each group refers to a separate face on a mesh, rename each group panel to start with “face”, followed by “\”, the face number, another “\” and then the chosen group name. For example: “face\1\straps”. Note that you can never name a group with a backslash (or a vertical bar for that matter). Put a picture on the face of the group panel to show people what it changes. When changing faces on a mesh, you can only change one face at a time on a mesh. But you can have several separate mesh prims with the same name and change the same face on them together.
- The root prim is a special case, it probably has a long descriptive name like “My Fancy Shoe (left)”, and the right shoe has (right) in the name. To allow changing both root prims together, there is a special name to use for group panels: Use “.root.” as the group or face name and it will allow changing all the root prims in the product at once.
- Click on several of the color group panels. (This is necessary only the first time for the HUD script to notice that the names have changed). Taking the HUD into inventory and wearing it again will also force it to re-evaluate the name changes.
You are done ! (With colors at least). Select colors from the palette and watch parts of your product change color to match!
Texture Map Buttons:
The HUD comes with three texture map buttons on the left side. (You can add more, see the “changing the look” section below). Put a texture map on the surface of each of these buttons to show what they do. This texture map can be different from the actual texture map used: It can be a picture of the product with the texture map applied.
There are several ways to link texture maps to the buttons, each way has different permission consequences:
Textures in the
HUD root prim: |
You can put all your textures in the root prim of the HUD then edit the name of each texture map button to start with “texture”, then a backslash (\) and then the name of your texture map. For example: “texture\Dino Skin Lite”. Unfortunately, you must leave every texture map FULL PERM or they will not load after changing ownership. Then your customers could take copies of your textures, this is not very secure.
|
Textures in the
root prim of
each product: |
You can put the textures in the root prim of each product, and reference it in the name of the texture map button. In this case you name the texture map button to start with “texture”, then a backslash (\) and then the name of your texture map. For example: “texture\Dino Skin Lite”. In this case, the texture map does not have to be full perm. Unfortunately people can still look at textures sent this way. Also, you must put the same texture map in the root prim of every object, for example in both left and right shoes.
|
| Textures by UUID: |
You can name each texture map button to start with “texture”, then a backslash (\) and then the UUID of the texture map in your inventory. For example “texture\f8f3a7b8-a88d-4090-80a6-ad34a2b67080”. This is very secure, your customers cannot copy the texture maps or look at them. This is an excellent way to reference textures if your product is only sold in one grid. Unfortunately, you cannot export the resulting product on the Kitely Marketplace. This is because the export logic at Kitely does not look in prim names for UUIDs of textures that need to follow the product.
|
Textures in a
“textable” script: |
To solve this problem, I added a way to reference textures from a textable script: You name your texture map buttons to start with “textable” then a backslash (\) then an index. The index can be the name of the texture map, or just a number (as long as you are consistent). Then you add that index and the UUID of your texture map to the textable script that I supply. You mark that script as NOMOD and include it in the root prim of the HUD. This is very secure, your customers cannot examine your texture maps, and they cannot read the script. The Kitely export logic does read the script and will find the UUIDs of all the textures. Your product can then be sold on the Kitely Marketplace.
|
Changing the Look of the Magic Color HUD:
Most things about the look of the Magic Color HUD can be edited. The HUD currently has a free-floating look with separate prims sticking out in different directions. You could put another prim behind them all to group them together. The color palette must always remain the root prim.
| COLOR PALETTE: | The HUD comes with a full-perm version of the texture map for the palette so you can download, edit and upload versions with your company and product names on it. The central color area of the palette should not be changed or moved. The border around it is a fixed ratio of the texture size (1/8th on all sides). However, you can stretch the prim the palette is on, stretch the texture with it and it will still work.
|
| VALUE BAR: | The value bar must remain vertical, but you can move it to any location, scale it to different sizes and ratios and it will continue to work. You should not change the texture map on the surface of this prim.
|
| CURRENT COLOR: | This prim can be any shape or size. All sides of this prim are changed to the current color.
|
| COLOR MEMORIES: | These prims can be any shape or size, although they should all be the same size. They can be moved around but they must overlap the border of the palette prim a little bit. This is because colors are stored in them whenever the mouse is clicked next to them on the border of the palette prim. You can add more color memories by duplicating one of these prims and linking it back into the build.
|
| COLOR GROUP PANELS: | During setup for your product, you put texture maps on each of these prims to show what areas of your product have their colors changed together. The name of each panel starts with "group " and ends in the group name. For example "group 1". When this group is selected, every prim in your product that has the name "1" will be changed to the current color. The name does not have to be a number, it can be any string that does not contain a vertical bar (|).
The color group panels can be any size or shape. However, the selected one is indicated by a prim (named box) in the HUD that moves behind the selected panel. So if you change the shape of all the panels, you will have to change the box prim to match. You can also change the color of the box prim.
|
| TEXTURE MAP BUTTONS: |
You can change the size, texture and number of these. Just add new button prims and change their names as described above. You can delete all of them if your product does not need texture changing.
|
| RESIZE BUTTONS: |
You can change the size, texture maps and have any number of these, just change their names to indicate the size change percentage (as described above). Rigged mesh shoes and clothing cannot be resized, so you can unlink these buttons and remove them from the HUD in that situation.
|
| DELETE SCRIPT BUTTON: |
You can change the size and texture map on this button, but there is no advantage to having more than one.
|
| RGB READOUT: | This is three prims that display letters and numbers on their surface. They also have small (low lag) scripts in them that do the work of displaying numbers. You can change the size of these prims, rotate and move them anywhere and they will continue to work.
|
| COLOR CURSORS: | Two square cursors move around on the palette and value bar to show the HSV of the currently selected color. You can change these to any shape, texture or color, but something with a hole in the middle is recommended so colors can be selected through the hole.
|
Permissions:
The Magic Color HUD is shipped to you full perm. COPY so you can make many copies, MOD so you can customize it, TRANS so you can include it in products that you sell to others. You must clear MOD and either COPY or TRANS for the next owner before you can ship it to your customers. I prefer to ship products with COPY set so my customers can recover if one gets lost, or rez several at once. You may prefer to ship products that cannot be copied, so the HUD supports TRANS only as well. To remind you to do this, the HUD will nag you with ANNOYING RED FLOATING TEXT! No, its not that I don't trust you, I always forget to do this myself! You can change the permissions for the next owner, copy it back into inventory, then always use that copy. It will never nag you again.
Inside the HUD is a script that is NOMOD but COPY and TRANS. (This may make the HUD look NOMOD from the outside, but you will be allowed to modify it). You may wish to change it to the same permissions as the HUD, but the script doesn't nag you about this.
Also inside the HUD is a note-card that is COPY MOD and TRANS. You can edit this note-card to reference your product by name, add landmarks to your store, etc. You can even change the name of the note-card and the help button on the HUD will still find it. You probably want to change this to just NOMOD.
The Magic Color Setter script is shipped to you NOMOD COPY and TRANS. You may wish to change this to the same permissions as you set the HUD, but you are not nagged to do so.
Once you change the permission to TRANS or COPY only, you may distribute copies of the HUD with your products and the setter script in the inventory of your products. You may never resell these by themselves without including them with or in your products. The scripts are copyright (c) 2014 by Mike Higgins (AKA Kayaker Magic) and are shipped to you noMOD so you cannot see the source. Attempting to break the protection, read the source or change the creator of these scripts is a violation of my copyright. To quote the MC++ CS gangsta rap song "Alice and Bob":
"Protecting messages to make my pay.
If you hack me, you're guilty under DMCA!"
If you are just curious about advanced color techniques on Open Simulator, track me down in-world. I love talking about scripting and sharing with my friends.
Lag Issues:
The Magic Color HUD is completely event driven and uses no SIM resources when you are not clicking on it.