gridGPS for Open Simulator
This is a HUD that impliments a full function GPS on the screen of your viewer. It impliments waypoints, routes and manages transponders from your vehicles and critters that are equiped with transponders.Waypoints:
You can set waypoints, then navigate or teleport back to them later. Waypoints are stored on a server and you can publish (or hide as private) your waypoints. When published, your waypoint will appear on the list of every other copy of this GPS on the Metaverse. Waypoints are named automatically with incresing numbers, or you can rename them. You can make a waypoint private again or delete it at any time.Routes
You can create routes: lists of waypoints that you are automatically navigated to one at a time in order. If you teleport to a route, you are taken to the first routepoint. Then you can navigate to the rest of the points in order. Routes can be made public, private, renamed and deleted like a waypoint.Transponders
If you have vehicles or critters that are equipped with a transponder, they can show up on this GPS. You can navigate to or teleport to any of your transponders. With this gridGPS you can make transponders public, private, reame or delete them. Note that if the transponder is still out there, it will re-create the record in the database, so deleting is only temporary. I sell transponders to put on your own vehicles, and give away snippets of code so you can add this function to your own scripts.Quick Instructions
Working with waypoints:
Press the mode button until it says  |
 |
To navigate to a waypoint, press  then select one by name from the dialog. then select one by name from the dialog.The red arrow and distance display will appear ande guide you to the chosen location. |
To teleport to a waypoint, press  then select one by name from the dialog. then select one by name from the dialog.You will immediately teleport to the chosen point. |
If the share button shows  , you will only see public waypoints on the dialogs. , you will only see public waypoints on the dialogs. will show only your private waypoints. will show only your private waypoints.  shows both. shows both.
|
If the local buttong shows  , you will only see waypoints on the grid you are on now. , you will only see waypoints on the grid you are on now.Click it to  and TPTO will only show you wayponts on other grids. and TPTO will only show you wayponts on other grids. will show you all wayponts, local or HyperGrid. will show you all wayponts, local or HyperGrid.
|
To create new waypoints, press  , then press , then press  to give it a nice name. to give it a nice name.To share your new waypoint with everyone press  to make it public. to make it public.
|
To change back, select a waypoint with , then press  to make it private again. to make it private again.
|
If you want to delete an old waypoint, select it with then press  . . |
|
To rename an old waypoint, press , select the one then |
Working with routes
Press the mode button until it says  . . |
 |
|
To follow a route, press then select a route. The red arrow and distance display appear to guide you to the first routepoint. As you pass each routepoint, the arrow will turn to point to the next one. |
| For convenience, the button will teleport you to the first point on a route. |
To create a new route, press  then to give it a nice name. then to give it a nice name.To share your new waypoint with everyone press to make it public.
|
Then go to each place the route should go past and press  . . |
To delete the last waypoint on the route, press  . . |
| Like waypoints, you can select a route with then, or make it public with .
|
Working with Transponders
| Press the mode button until it says |
| Your GPS can act as a transponder and publish your position as a public transponder.
Press the  button and your avatars position will be published as a transponder. button and your avatars position will be published as a transponder.Anyone can navigate or teleport to you with the gridGPS. Press the  button to turn this transponder off. button to turn this transponder off.
|
| You can use the and buttons to go to the last known location of transponders. |
| The , and buttons work on transponders. |
| However, an active transponder will put itself back in the database. |
| Note that transponders update their locations infrequently and their positions may be out of date. |
Detailed documentation for the gridGPS
| Button | Function | |
One button switches between three different modes for managing waypoints, routes or transponders. Each mode has a button or few that only appear in that mode, these related buttons have colors that match the current mode. Then there are buttons that are always available in every mode which have white lettering. |
|---|---|
|
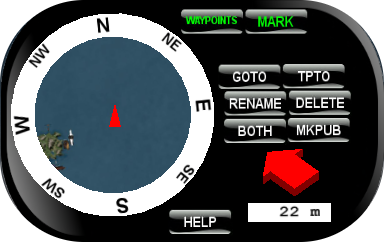
When you are managing waypoints, this green mode is displayed. The display switches to show the nearest waypoints, if any. This is the default mode. When in this mode the green MARK button appears to create new waypoints The white buttons (GOTO, TPTO, PUBLIC/PRIVATE, MKPUB, RENAME and DELETE) work with waypoints in this mode. |
|
This green button marks your current location as a new waypoint. The name of your waypoint is based on your last named waypoint with the numbers bumped by one. The default waypoint names start out as "WayPoint001", if you want a different series, use RENAME after MARKing a new waypoint. |
|
One button switches between three different display modes.
When this button says PRIVATE you only see the private waypoints and routes that you made.
The GOTO and TPTO dialogs will only show private waypoints, routes and transponders that belong to you.
The display will only show nearby waypoints.
When this button says PUBLIC it only alows other commands to show public waypoints routes and transponders, both yours and ones that belong to others. When this button says BOTH then the other commands show all public and your private waypoints. |
|
One button switches between three different categories of waypoints. When this button says LOCAL the GOTO and TPTO dialogs witll only show waypoints on the grid you are on. HYPERG will only show waypoints that are on other grids. ALL will show all waypoints on all grids. |
|
This button brings up a list of waypoints, routes or transponders
(depending on your mode set by the WAYPOINTS/ROUTES/TRANSPONDERS button).
Then the arrow on the display rotates to navigate you to the selected waypoint.
Note: GOTO only works on waypoints that are on the same grid as your avatar. It can list only your private waypoints, only public waypoints, or both. See the PRIVATE/PUBLIC button to choose which you will see. The waypoints appear in a standard dialog box. If there are more than 12 waypoints, a MORE button will appear to select the next 11. Pressing MORE after the last page of waypoints will bring you back to the first 11 again. |
|
This button brings up a list of waypoints, routes or transponders
(depending on your mode set by the WAYPOINTS/ROUTES/TRANSPONDERS button).
Then you are teleported to the selected point.
Note: TPTO does work on waypoints that are on other grids. It can list only your private waypoints, only public waypoints, or both. See the PRIV and PUB buttons to choose which you will see. The waypoints appear in a standard dialog box. If there are more than 12 waypoints, a MORE button will appear to select the next 11. Pressing MORE after the last page of waypoints will bring you back to the first 11 again. |
|
This button toggles the pubic/private status of the last waypoint, route or transponder that you selected.
If the waypoint is private, MKPUB is displayed and pressing it changes your waypoint to a public one.
Once public, a waypoint can be found with GOTO or TPTO by anyone in the Metaverse.
If the waypoint is public, MKPRV is displayed on the button and pressing it changes your waypoint to private.
Only you will see your private waypoints, routes and transponders in the dialog from GOTO and TPTO.
You can press MKPUB right after MARK or NEWRT to change a new waypoint or route to public. Or you can press GOTO to select an existing waypoint, route, or transponder then press MKPUB/MKPRV to change the status of that waypoint. Note: You can only change the public/private status of your own waypoints, not the public waypoints listed by other users. |
|
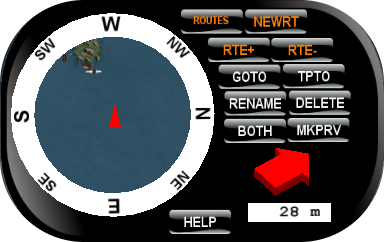
When you are managing waypoints, this orange mode button is visible. This button switches the display to show the nearest routes, if any. Three other orange buttons appear for managing routes (NEWRT, RT+ and RT-) In this mode the white buttons (GOTO, TPTO, MKPUB, RENAME and DELETE) work with route lists in storage. In route mode, the GOTO and TPTO only show you routes instead of waypoints. The GOTO button navigates you to the first point on the route, then to each point in the route in order. The TPTO button teleports you to the first point in the route. |
|
This orange button creates a new route and marks the current location as the first waypoint in the route. The name of your route is based on your last named route with the numbers bumped by one. The default route names start out as "Route01", if you want a different series, use RENAME after NEWRTing a new route. |
|
This orange button adds a new routepoint to the end of the current route. The current route is the one recently created, or the one selected by a recent GOTO or TPTO button. Note that you cannot name routepoints, only the route that they are stored under. |
|
This orange button deletes the last routepoint off the end of the current route. |
| When you are managing waypoints, this cyan mode button is visible. This button switches the display to show the nearest transponders, if any. It also changes the mode so the white buttons (GOTO, TPTO, MKPUB, RENAME and DEL) work with transponders in the database. In transponder mode, the GOTO and TPTO only show you transponders instead of waypoints. The GOTO button navigates you to the last known position of the transponder. To prevent lag, transponders do not report very often, so this position may be up to a minute late. The TPTO button teleports you to the last known position of the transponder. The DEL button deletes the transponder from the database, but an active transponder will put itself back in again. | |
|
Pressing this button turns on the built-in transponder in the gridGPS. When this button says "showme" you are hidden and your position is not published. |
|
Pressing this button turns off the built-in transponder in the gridGPS. When this button says "hideme" your current position is updated to the database and anyone can find you, navigate to you or teleport to your location. Your name appears on the list of public transponders and anyone can GOTO or TP to your location. |
|
This button allows you to rename the last waypoint or route created, or any waypoint, route or transponder recently selected with GOTO. To choose a new name for a new waypoint, press RENAME right after you create one. To rename an existing waypoint, use GOTO to select a waypoint, then RENAME to change the name of the selected one. When you click RENAME, a "textbox" dialog appears. Type a new name into this box and press the SUBMIT button. Names should be kept short, 12 letters or less, (this is a restriction of the dialogs in the viewers). It is recommended that you put a few numerals on the end of a waypoint name. Waypoint names may not have spaces, vertical bars (|) or newlines in them. If you put any of these characters in a name, the name will be cut off at the offending character. |
|
This function deletes waypoints from your list. First select a waypoint with the GOTO button, then press DELETE to perminently delete the waypoint. There is no way to recover a deleted waypoint. if you press DELETE immediately after creating a new waypoint or route, the new waypoint will be deleted. |