Race Course System
Kayaker Magic, February 2018
If you see features here that you don't remember (like border crossing gates in the OpenSim version) this means you didn't get the update message! Contact Kayaker Magic to get a new update. Updates are always free!Previous update September 2015
This is a race course system for setting up races in Open Simulator. Racers pass through start, checkpoint and finish gate prims to log times to the nearest 1/100th of a second. The results are stored on a WEB server and can be displayed in-world or outside on a WEB browser. A race can be setup to cross multiple regions since communication between the gates goes through the server.- Introduction
- Easy Setup
- Start Gates
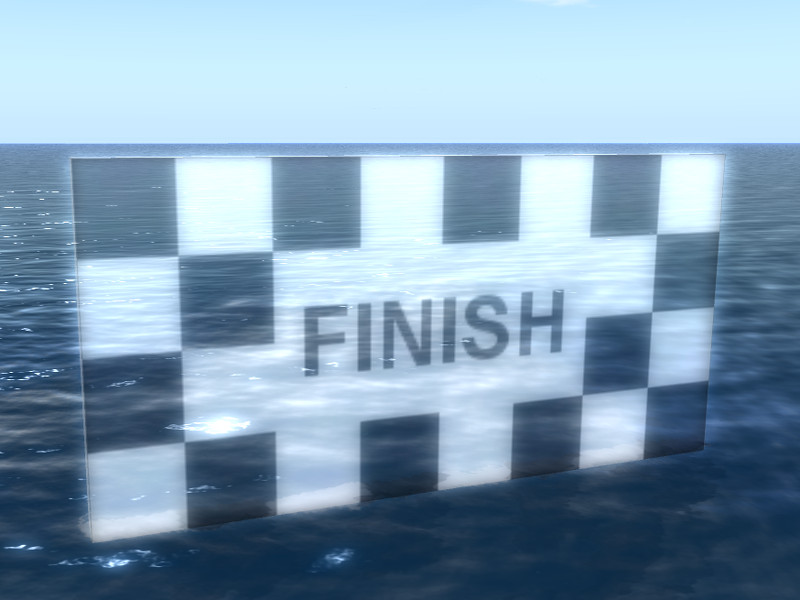
- Checkpoint Gates
- Finish Line Gates
- Status Board
- Race Admin HUD
- Justin Gate HUD uses region crossings as gates
- Xmas Tree Gate for drag racing
- Race Permits how the server is funded.
- Best practices for placing gates.
- Choosing the Right Version (from the 4 options supplied)
- Crossing Gates
- Customizing your gates
- Lag issues with gates
Introduction
This is a race course system that can be set up across multiple regions in the same grid. You put up a Start Gate, up to 9 Check Points and a Finish Line. Racers pass through the Start Gate prim and their start time is recorded. They must pass through each of the Check Points in order or they are disqualified from the race. When they pass through the Finish Line prim, their final time is recorded on a status board. The status board shows the progress of the race so far: Who is racing, how many Check Points passed, their current time and status (racing, disqualified or finished). Racers can run the course in heats, and they all will be added to the status board as they start. Racers can run the course again if they wish and only the most recent time is displayed. When everyone has completed the course, the status board shows the winners. The status board can be watched "in real time" on a WEB page in RL, or on a prim in-world. You can limit the race to vehicles with a specific class, based on the first part of the vehicle names. Note that the system cannot work without a connection to the internet, the ability to make llHTTPRequest calls over the internet, and (depending on the version) the ability to be called back with llRequestURL.As suggested by Justin Lake, I can use a region border crossing as a gate. Racers wear a small HUD (called a Justin Gate). Just crossing the border into selected regions wearing this HUD is equivalent to passing through one of the gate prims. In this case, no prim gates are needed in the region, so no permissions (besides object entry) is required to set a race up across an entire grid. To set this up the race organizer travels to each sim and uses a special Race Admin HUD to mark regions as Start, Checkpoint, or Finish “gates”. It also works together with the prim-based gates in any combination. For example, you could have prim start and finish gates, but require that racers pass through a list of regions between those two.
This system comes with 4 different versions of the race gates: Sets that work across borders into different regions and ones that do not. A set that uses physics to detect vehicles crossing the gates and one that does not. All combinations of those two options makes 4 different versions. See the Choosing the Right Version section below. Start with the NB (non-physical, border crossing) version if you aren't sure yet.
- Timed races with Status Board
- Works across multiple regions in OpenSim 0.9
- Start Gate, Finish Line and up to 9 Check Points
- Drag race “xmas tree” version of start gate available
- Can use SIM borders as gates
- Times any vehicle type: Boats, planes, etc, even just avatars
- No limit on number of racers
- Optional limit race to specific class
- Race status on WEB page or Status Board prim
- Results to 1/100th second
- Racers can do the course in heats, new racers are added to status board
- All prims MOD so you can customize
- 5 prims, COPY MOD notrans
Easy Setup:
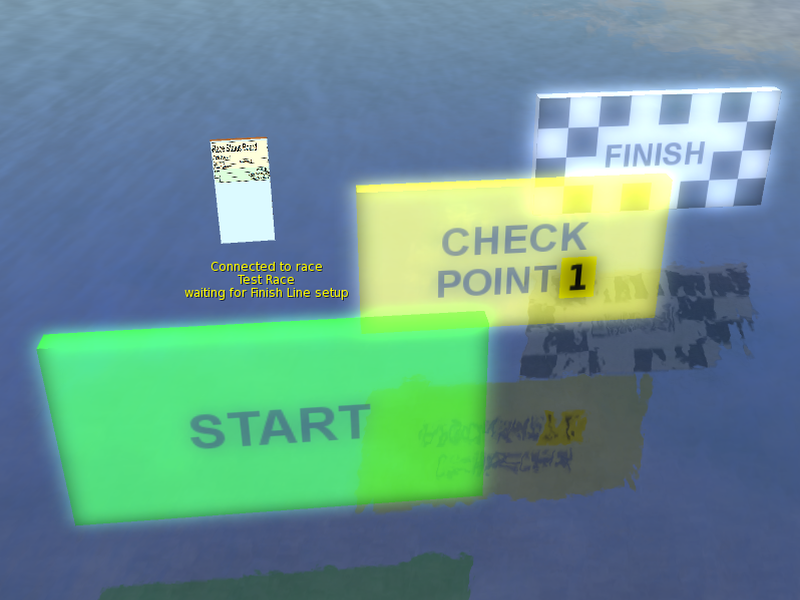
Rez a Start Gate and use its dialog to name a new race. Rez a series of Check Points, click on their numbers until they show the correct value (1, 2 3 etc), then use their dialogs to connect with the Start Gate. Finally rez a Finish Line, use its dialog to connect with the rest of the gates, this enables the race. All the gates will connect up and say "Ready to Race", even if they are each in a different region. You can drag the prims around after they are set up, they will continue working even if moved across a SIM boundary (in Opensim 0.9 or better). Once they are set up, you can take them into inventory and the next time they are rezzed, they will automatically connect up with each other. (You must rez the Start Gate first, then all the Check Points, and finally the Finish Line).
You can set up many races at once, each with a different name, and they will each work independently. The racers may get confused if the gates are near each other. A racer that goes through one Start Gate will only be recognized by Check Points and Finish Line gates that are connected to that Start Gate.
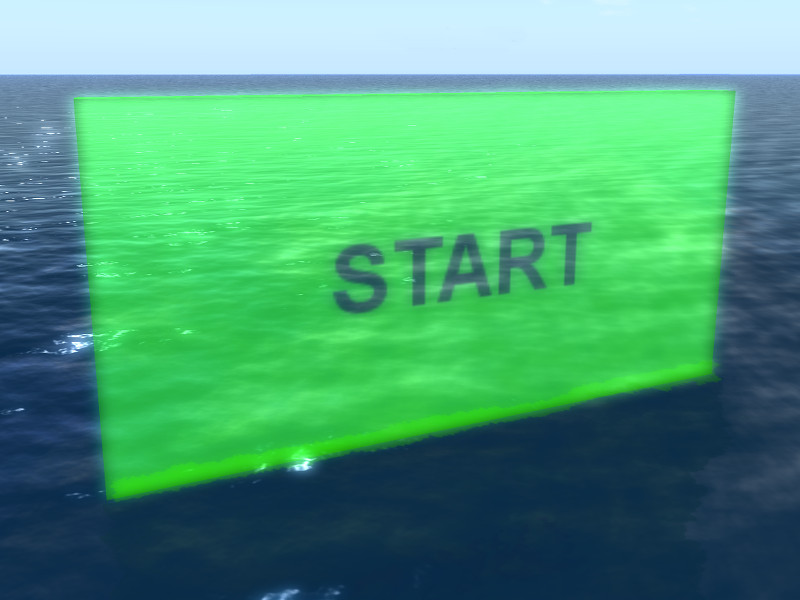
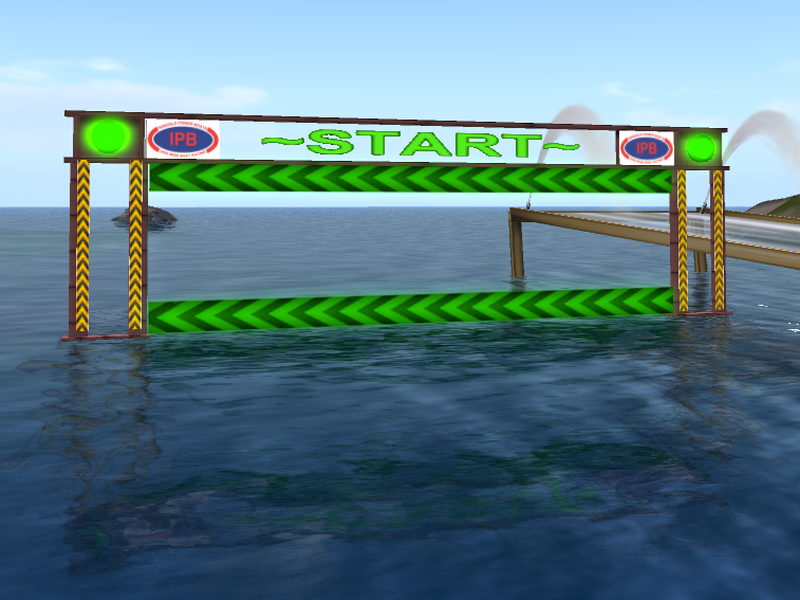
Start Line Gate:
Rez one of these and set it up as the start of your race. It is MOD so you can stretch it out, change the texture map or the color. Racers must pass through this prim to enter the race and start their timers running. Racers can go through the Start Gate several times, the last time through is the one used for timing. Next you must connect the Start Gate to the server by using the dialog to connect to a race. Left-click on the Start Gate to bring up the dialog. This dialog has several buttons that perform the following operations:| CONNECT | This button re-connects to the last race you had set up. (The button does not appear if there is no old race to connect to). The Check Points and Finish Line must each also be connected next. |
| NEW RACE | This button asks you to enter the name of your new race in a textbox. Only the first line of text entered in the box is used. You are charged one race permit for setting up a new race. (Only if you complete the transaction by clicking SUBMIT on the textbox). The Check Points and Finish Line must each also be connected next. |
| PREV RACE | This button brings up a list of recent races you have set up and lets you select one of those. The full names are listed above with a number, since the whole name may not fit on the buttons below. Click on the button with the number that matches the one next to the name and you will be connected to this race. There is no charge for this, once a race name is made up it can be restarted or re-assigned for two weeks before it expires. The Check Points and Finish Line must each also be connected next. |
| FINISH | This button allows the Start gate to do double duty as a finish gate when your race runs around a loop. Set up a race in the normal way, but instead of CONNECTing a Finish gate, click the FINISH button on the Start gate. Then when a racer crosses the Start gate the first time they are entered in the race, and when they cross it a second time it is as if they crossed the finish line. |
| CLASS | This button asks you to enter the class of vehicle allowed to enter the race. You type the class name in the textbox that appears. The class name must be the first few characters of the vehicle name. For example, you could enter "Catamaran" and the race would only time avatars riding copies of my Catamaran. All other vehicles would be ignored by the gates. If you submit this text box empty, then all vehicles would be allowed to race, even flying avatars. If you entered just "C", then any vehicle who's name starts with the letter "C" would be allowed to race. So "Catamaran" and "Changeling" could both enter. |
| RESET RACE | Press this button to cancel the current race. All the Check Points and the Finish Line will also disconnect and will have to be re-connected one at a time if you want to set this race up again. The list of racers and their current status will stay on the status board for this race unless you CLEAR them first. Resetting a race stops all the prims from communicating and decreases the load on your server, so you might want to do this when you know the race course is not going to be used for a while. |
| CLEAR RACERS | This button clears all the racers from the Status Board so that a race can be started over again. The next racer that goes through the start gate will appear on the status board as if she was the first again. |
| PAUSE | This button temporarily pauses a race. The Start Gate will not recognize any new racers that cross it. Racers that are in transit will be allowed to finish the course and cross the Finish Line and their times will be recorded. |
| CONTINUE | After a race is paused, you can allow it to proceed again by pressing this button in the dialog. |
| BUY PERMITS | When you press this button you buy new permits with PayPal. The BUY PERMITS button brings up the "Load web page" dialog. Click the "Go to Page" button and the PayPal one-click page will appear. Log into your PayPal account in the normal way and complete the transaction. (This happens between you and PayPal with no way for my script to eavesdrop on it). It will take a few seconds for the transaction to register with the Race Course System. PayPal doesn't send a message all the way back to the Start Gate prim, so the only way to know that the transaction completed is to wait a minute and try to create a new race or extend an active one. Eventually the new permit total will appear in the dialog box above these buttons. |
| EXTEND | This button extends the expiration date of a race. Normally a race is deleted from the database after a few weeks. You may wish to leave a race working longer, for example for demo purposes. When you press this button a list of all your recent races appears. Click on the button that has the number corresponding to the race you want to leave up longer. This uses up one of your race permits but adds 2 weeks to the expiration date of that race. You can extend a race several times, two more weeks are added each time. You don't have to wait until the race is about to expire, you can extend it at any time. |
| DELETE | This button deletes one of your races. Press this button to bring up a list of your recent races. Click on the button that has the number corresponding to the race you want to delete. The race is immediately deleted and there is no way to recover it again. |
Check Point Gates:
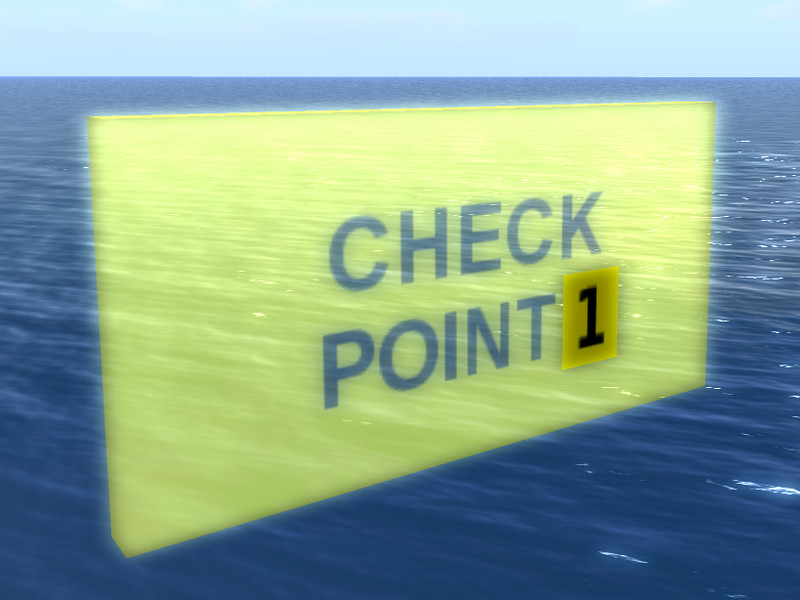
You can rez up to 9 Check Point gates, or none if you don't need them. Racers must pass through all the Check Points in order or be disqualified from the race. Rez each chekcpoint and click on the number until it displays the right order number. You must start with Check Point 1, and proceed in order. (eg, if you have 3 Check Points they must be 1 2 and 3, not 2 3 4 or 4 6 9). After you have set the correct number on a Check Point, left-click the gate to bring up its dialog to connect to the Start Gate. The dialog has the following buttons with the following meanings:| CONNECT | This button connects to the race that you just set up with the Start Gate gate. The rest of the Check Points (if any) and the Finish Line must be connected next. |
| RESET RACE | Press this button to cancel the current race. All the Check Points and the Finish Line will also disconnect and will have to be re-connected one at a time if you want to set this race up again. The list of racers and their current status will stay on the status board for this race unless you CLEAR them first. |
| CLEAR RACERS | This button clears all the racers from the Status Board so that a race can be started over again. The next racer that goes through the start gate will appear on the status board as if she was the first again. |
Finish Line Gate:
Once the Start Gate and Check Points have all been set up, you can rez and connect to the Finish Line last. Left-click on the gate to bring up the dialog which has the following buttons on it:| CONNECT | This button connects to the race that you just set up with the Start Gate. The Start Gate and all the Check Points (if any) will then display "ready to race" above them if things are set up correctly. Note that you cannot add more Check Points at this time. To do that you will have to reset the race, rez a new Check Point, then re-connect the Start Gate, Check Points and Finish Line in order. |
| RESET RACE | Press this button to cancel the current race. All the Check Points and the Finish Line will also disconnect and will have to be re-connected one at a time if you want to set this race up again. The list of racers and their current status will stay on the status board for this race unless you CLEAR them first. |
| CLEAR RACERS | This button clears all the racers from the Status Board so that a race can be started over again. The next racer that goes through the start gate will appear on the status board as if she was the first again. |

Status Board:
The Status Board shows the status of the race: Who is still racing, who is disqualified, who has finished the race, what their times are and where they placed. This is a WEB page on a prim, so the WEB page is also available on any browser on the Internet. http://magic.kayaker.net/racer/status.php will show a list of all the recent races you can monitor. The racer times stay up on this WEB site for a week or so after a race. The status page refreshes itself automatically every 30 seconds so you will get updates as a race takes place. You can refresh the WEB page yourself to get quicker updates and watch the progress of a race "live"!To set up a Status Board in-world, rez one after you have set up the Start Gate. The status board will automatically connect to the last race you set up with the Start Gate. The owner can right-click on the board and select touch to bring up a dialog. (Left-clicking on the back is supposed to work, but media-on-a-prim often steals this click so right-clicking is more reliable). The dialog allows you to change which race is displayed and other options described below. Every time the Status Board is rezzed or the race changed, the face may change to a bank white surface. Each avatar that wants to see the race status must click on this surface to get their viewer to show the WEB page. Once they have done this, the display will update once every 30 seconds.
The Status Board shows which racers have been disqualified, usually for passing through the checkpoints out of order. Disqualified racers can return to the Start Gate and try again. If a disqualified racer does not start the race over again within 15 minutes, they are deleted from the board. Racers that are in transit between the Start and Finish Line are shown in a separate section of the Status Board. The number of Checkpoints they have passed and their approximate time so far is displayed. If a racer takes longer than 60 minutes to finish the race, they are deleted from the board. When racers cross the Finish Line, they are moved into the "Racers that finished" section of the Status Board. Here they are sorted into order with the fastest time first. The time displayed here is accurate to a hundredth of a second.
The owner of the Status Board can right-click and touch to bring up the dialog and change the following options:
| CONNECT | This button connects to the race that you last set up with the Start Gate gate. This happens automatically on a rez. If you rez the Status Board out of order or change the race name on the Start Gate you will need this button to display the right gate on the Status Board. Or use PREV RACE (see below) to choose a race manually from a list. |
| RESET RACE | Press this button to cancel the current race. All the Check Points, the Start Line and the Finish Line will disconnect and will have to be re-connected one at a time if you want to set this race up again. You must reset a race if you delete or add new checkpoints. The list of racers and their current status will stay on the Status Board for this race unless you CLEAR them yourself. |
| CLEAR RACERS | This button clears all the racers from the Status Board so that a race can be started over again. The next racer that goes through the start gate will appear on the status board as if she was the first again. |
| PREV RACE | This button brings up a list of recent races you have set up and lets you select one of those. The full names are listed above with a number, since the whole name may not fit on the buttons below. Click on the button with the number that matches the one next to the name and you will be connected to this race. The Status Board will go blank and everyone must click on that blank surface to see the status of the race you picked. |
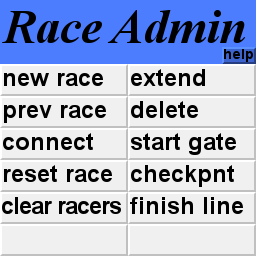
Race Admin HUD
This is a HUD that can be used by the race owner to set up any region as a gate. This allows you to set up a race all over the grid without having to leave prims. Just crossing into a region set up this way will start, finish or clock you into a checkpoint. To use this kind of “gate” each racer must wear the Justin Gate HUD (described below). You can mix an match prim and "region" gates to construct your race course. You cannot use a region for more than one region gate, but you can put several prim gates in the same region.The race organizer wears this HUD then goes to each SIM on the race course and uses buttons on the HUD to add each SIM to the race. The buttons on the HUD have the following functions:
| START GATE | If you are connected to a race (see NEW RACE and PREV RACE below) then this button marks the current region as a Start Gate. The current region is the one that the avatar wearing the HUD is in at the moment. Racers entering this region at any location along all 4 edges will be entered in the race. Note that “SIM Start Gates” cannot have a race class because there is no way for the HUD to know the type of boat you are in. If you want your race to exclude all but boats belonging to a particular class, then you must use a prim Start Gate. |
| CHECKPOINT | First click on the number on this button until it displays the checkpoint number you want. Then click the word CHECKPOINT to mark the current region as a checkpoint. Racers will have to cross this region (and all the other checkpoints) in numerical order to successfully complete the race. |
| FINISH LINE | Pressing this button marks the current region as the finish line of the race, and enables the race to start. Any prim race gates will immediately say “Ready To Race” above them. When a racer enters this region at any location along all 4 edges they will finish the race and their final time will be calculated. |
| NEW RACE | This button prompts you to create a new named race. This costs you one race permit. Type a new name into the text box that appears, then click SUBMIT. Only the first line of your name is used, any extras are ignored. The race is created and is connected as the start gate. The next steps are to connect check points and a finish line gate. |
| PREV RACE | This button brings up a list of recent races you have set up and lets you select one of those. The full names are listed above with a number, since the whole name may not fit on the buttons below. Click on the button with the number that matches the one next to the name and you will be connected to this race. There is no charge for this. If the race does not have a start gate yet, you can make this region be the one with the START GATE button. |
| CONNECT | If you wear the HUD after already starting to set up a race, use this button to connect to the last race mentoned in a start gate. Alternately, you can tell the HUD what race you are working on with the PREV RACE button above. |
| RESET RACE | Press this button to cancel the current race. All the Check Points and the Finish Line will also disconnect and will have to be re-connected one at a time if you want to set this race up again. The list of racers and their current status will stay on the status board for this race unless you CLEAR them first. Resetting a race stops all the prims from communicating and decreases the load on your server, so you might want to do this when you know the race course is not going to be used for a while. |
| CLEAR RACERS | This button removes all the racers from the Status Board so that a race can be started over again. The next racer that goes through the start gate will appear on the status board as if she was the first again. |
| EXTEND | This button extends the expiration date of a race. Normally a race is deleted from the database after a few weeks. You may wish to leave a race working longer, for example for demo purposes. When you press this button a list of all your recent races appears. Click on the button that has the number corresponding to the race you want to leave up longer. This uses up one of your race permits but adds 2 weeks to the expiration date of that race. You can extend a race several times, two more weeks are added each time. You don't have to wait until the race is about to expire, you can extend it at any time. |
| DELETE | This button deletes one of your races. Press this button to bring up a list of your recent races. Click on the button that has the number corresponding to the race you want to delete. The race is immediately deleted and there is no way to recover it again. |

Justin Gate HUD
This is a HUD that looks like a small checkered flag on your display. Racers only have to wear this when the race includes regions that are being used as race gates. Crossing into one of those regions at any location along the 4 sides will be counted as entering the race, bagging one of the checkpoints, or finishing the race. The HUD will display your last crossing time so far and status (still racing, disqualified or finished) at the time that you cross the region border.
To initialize the Justin Gate HUD: After you wear it, you must connect to a race by name. Click anywhere on the HUD to bring up a list of recent races. Click on the number corresponding to the race you wish to join. If the status of the race is “racing” you are ready to go. If the status is “idle” or “waiting”, this means the race is still being set up by the organizer. When the race is ready, you will have to click and select the race from the list again.
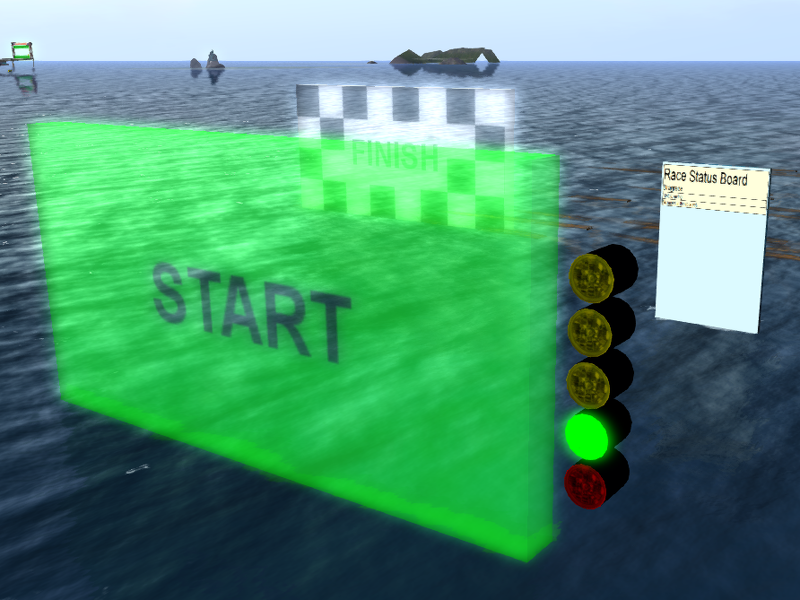
Xmas Tree Gate:
This is a special edition of the Start Gate which has a row of lights called a “Christmas Tree”. When a race starts, the yellow lights come on one at a time, then the green light. Racers who jump the gun and cross while the light is not green are disqualified. By default, each yellow light is on for 1 second, then the racers have 2 seconds to cross while the green is on. You can change these times in the .params NC in the start gate. After the time is up, or if there is a disqualification, the red light comes on. To start a race, the owner of the gate selects the START button from the dialog (see below). Alternately, the owner can set up the gate so anyone can start a race by clicking on the the gate.The Xmas Tree Gate is intended for drag racing, so it is sold with just a Finish Gate and a Race Status Board. However, the Xmas gate is compatible with the Justin HUD, Admin HUD, Checkpoint Gate from the regular Race Course System. If you buy both systems you can mix and match the gates in any logica way. For example: Start a race with the Xmas gate, pass through regions with the Justin HUD, through Checkpoint Gate prims and finally a Finish Gate from either system.
Rez one of these and set it up as the start of your race. It is MOD so you can stretch it out, change the texture map, the color, add prims to customize the gate. Next you must connect the Xmas Gate to the server by using the dialog to connect to a race. Left-click on the Xmas Gate to bring up the dialog. This dialog has several buttons that perform the following operations:
| START | This button starts the "christmas light" sequence to start the race. This button only appears after all the gates are connected together, as described below. |
| OWNER/ANYONE | One button switches between two modes. In OWNER mode, only the owner of the gate may start a race by bringing up the menu and pressing the START button. In ANYONE mode, anyone can start a race by clicking on the gate itself. |
| CONNECT | This button re-connects to the last race you had set up. (The button does not appear if there is no old race to connect to). The Finish Line must also be connected next. |
| NEW RACE | This button asks you to enter the name of your new race in a textbox. Only the first line of text entered in the box is used. You are charged one race permit for setting up a new race. (Only if you complete the transaction by clicking SUBMIT on the textbox). The Finish Line must also be connected next. |
| PREV RACE | This button brings up a list of recent races you have set up and lets you select one of those. The full names are listed above with a number, since the whole name may not fit on the buttons below. Click on the button with the number that matches the one next to the name and you will be connected to this race. There is no charge for this. The Finish Line must also be connected next. |
| CLASS | This button asks you to enter the class of vehicle allowed to enter the race. You type the class name in the textbox that appears. The class name must be the first few characters of the vehicle name. For example, you could enter "Catamaran" and the race would only time avatars riding copies of my Catamaran. All other vehicles would be ignored by the gates. If you submit this text box empty, then all vehicles would be allowed to race, even flying avatars. If you entered just "C", then any vehicle who's name starts with the letter "C" would be allowed to race. |
| RESET RACE | Press this button to cancel the current race. All the Check Points and the Finish Line will also disconnect and will have to be re-connected one at a time if you want to set this race up again. The list of racers and their current status will stay on the status board for this race unless you CLEAR them first. Resetting a race stops all the prims from communicating and decreases the load on your server, so you might want to do this when you know the race course is not going to be used for a while. |
| CLEAR RACERS | This button clears all the racers from the Status Board so that a race can be started over again. The next racer that goes through the start gate will appear on the status board as if she was the first again. |
| PAUSE | This button temporarily pauses a race. The Start Gate will not recognize any new racers that cross it. Racers that are in transit will be allowed to finish the course and cross the Finish Line and their times will be recorded. |
| CONTINUE | After a race is paused, you can allow it to proceed again by pressing this button in the dialog. |
| BUY PERMITS | This button sets you up to buy 20 more race permits for USD$4.00. It brings up the "Load web page" dialog. Click the "Go to Page" button and the PayPal one-click page will appear. Log into your PayPal account in the normal way and complete the transaction. (This happens between you and PayPal with no way for my script to eavesdrop on it). It will take a minute for the transaction to register with the Race Course System. The next dialog will show your new number of permits and the NEW RACE button will allow you to start new races again. You can buy new permits in advance, they are added to your total. |
| EXTEND | This button extends the expiration date of a race. Normally a race is deleted from the database after a few weeks. You may wish to leave a race working longer, for example for demo purposes. When you press this button a list of all your recent races appears. Click on the button that has the number corresponding to the race you want to leave up longer. This uses up one of your race permits but adds 2 weeks to the expiration date of that race. You can extend a race several times, two more weeks are added each time. You don't have to wait until the race is about to expire, you can extend it at any time. |
| DELETE | This button deletes one of your races. Press this button to bring up a list of your recent races. Click on the button that has the number corresponding to the race you want to delete. The race is immediately deleted and there is no way to recover it again. |
Race Permits:
These race gates communicate through a server. To help fund my server, you will eventually have to buy "race permits" to create each new race. This will cost you USD$0.20 (twenty cents) for each race set up. A named race can be used several times, but after a few weeks it will “expire” and stop working. Eventually it will be deleted from the server (unless you extend it, see the Start Gate instructions). When you buy the Race Course System it comes with 20 "race permits" that allow you to create 20 new races. When these run out, you can buy 20 more for USD$4.00. You can pay for race permits from the Start Gate or the Xmas Tree gate dialog with PayPal. I will use this money to buy beer \\\\\\\\\ to help pay the costs of maintaining the server. I am using an Internet service provider in Ohio for this purpose and have had continuous reliable service from them for over 10 years.Placement of gates:
After a vehicle crosses a region border, the servers are a bit confused about where it is for a few seconds. So you should not place gates close to the edge of a region. This is not an issue with Justin Gates, so check those out for using the border itself as the gate.The physical gates depend on the physics engine to detect racers colliding with them. You should set the gates up so that they are not sticking through other objects. Intersecting other objects, especially scripted ones, may generate lots of collision events and slow down your server.
Non-physical gates use llSensorRepeat to detect racers crossing. You should place the gate where it is not near other objects, especially scripted objects or other avatars. For example, placing the Finish Line less than 25 meters from a bleacher full of avatars will slow down your server. (It will have to check each of the avatars in the bleacher twice a second to see if they are crossing the gate). The larger you make your gate, the larger the area it has to look for avatars and vehicles. In this case you may wish to switch to a physical gate.
Choosing the Right Version:
You will see 4 different versions of each gate with different letters on the end after the version number. N, P, R and B. Which ones should you use? I recommend you use the ones that end in NB unless you are required to change: Here is what those suffixes mean:| N | Non-physical. The gates use a mathematical non-physical way to detect avatars or vehicles crossing the gates. Unless the gate is in “race class” mode, the center of mass of the avatar must pass through the central rectangle of the gate to be detected. This is true even if the avatar is riding on a vehicle. If the vehicle passes through the gate but the seat is so high that the avatar goes over, the avatar is not counted as crossing the gate. In “race class” mode, the gates use the same mathematical non-physical way to detect vehicles. The center of mass of the vehicle must pass through the rectangle of the gate. Non physical gate crossing uses a lot of system resources because the script has to check often (twice a second) to see where everything is in relation to the gate. But this works without any help from any physics engine. | P | Physical. The gates use physical collisions to detect vehicles crossing the gates. In this case, you are counted as crossing the gate if even a fender of your physical vehicle clips the corner of the gate. The gates can only detect vehicles and assume the owner of the vehicle just crossed. If you drive a vehicle that you don't own, you will not get credit for winning the race. Physical gate crossing uses fewer resources because the script sleeps until a collision happens. Unfortunately, the physics engines use a lot of resources and are not always reliable at detecting collisions. | B | Border crossing. The gates can communicate across region borders. This depends on prim communications with llRequestURL(). This in turn requires that your grid be set up properly for HTTP-IN URLs with the ExternalHostNameForLSL parameter in the OpenSim.ini file. This is probably set up for all professional grids, but many smaller grids, private grids or regions in OSGrid are not set up properly for this. If the B gates cannot communicate, try the R versions. | R | These gates use channels to communicate. Unfortunately this version cannot communicate across region borders, and the entire race must be inside one region. Var regions are large so there are many cases where this is OK. But if you want race events to cross borders, bug your sysadmin to fix the ExternalHostNameForLSL parameter. |
Crossing the Gates:
When using physics based gates the time a vehicle crosses the gate is the time that any part of the vehicle touches any part of the gate. The system looks up the owner of the vehicle and keeps time for that avatar in the race. If you are driving a borrowed boat, the Status Board will show the owners name, not the drivers name. This is an old "feature" of physics based timing gates that has existed forever, even on SL.When using non-physics based gates, the time a vehicle crosses the gate is one of two events: If there is no race class, the time that the center of the avatar crosses through the gate is used. If a race has a class name set, the time that the center of the vehicle passes through the gate is used. When there is a class name set, the owner of the vehicle gets the score, not the driver. When there is no class name for a race, the driver of the vehicle gets the score, even if the boat belongs to someone else. If your vehicle has several avatars riding in it, they will each show up on the status board. Their times will usually be identical but changing speed while crossing can intruduce small times.
For demo boats it is preferred that the driver of the boat gets the score, so in this case you may wish to use the non-physical version. See the section about Choosing the Right Version.
The non-physical gate crossing detector uses more system resources than the physical one, so if you expect every racer to own their own boat you will want to use the physical versions of the gates. Both types of gates can detect avatars, physical or non-physical vehicles.